Tuesday, May 31, 2011

Memorial Day Grill Lovin'

So to kick off summer in style we found it only fitting to buy our first "big" person grill none other than Memorial Day weekend. After talking with countless people and accepting loads of advice (most of which was out of our price range) we settled on this black beauty:

 
 It's certainly not as magnificent as all of the other grills at the Depot...but we were just as thrilled to roll out of there with this on our dolly. But first, we had to checkout. We pull up to the register giddy that black beauty was already assembled for us and the checkout lady asked if we want a 2 year warranty for $12. On an $88 dolla-grill? So what you're saying is we can get a brand new grill in the next 2 years if something breaks? For free? Yes please. Oh yeah and we had a 10% off Lowe's coupon that Home Depot will honor. So essentially we got the warranty for free.

What should we make for our first meal? A friend gave us a great burger idea and here is the recipe I used (I made them in bulk to freeze so we will be happy burger eaters this summer).

Organic Black Bean and Brie Stuffed Burgers
4 lbs. Organic Ground Beef
2 Diced Red Onions
2 Cans Organic Black Beans
1 tsp. Garlic Powder
1 tsp. Ground Cumin
1 tsp. Salt
1 tsp. Pepper
  
First I sauteed the onions until they were tender.
Then I combined the meat, onions, black beans, and seasonings.
I added a dollop of brie in the middle of each burger. Did you know you are supposed to press down in the middle of the burger so they cook evenly? Look! I made 20 burgers. Lot's of fun this summer...
 Ta Da! Here is the final product. I made up some summer slaw with bok choy and cabbage to go with the burgers. It was the perfect Memorial Day!


Sunday, May 29, 2011

30 Week Bump-Date

It was beautiful weather here this week so we celebrated with a walk on the beach. I've had some requests for a bump update. Here it is!


Hope everyone has a great Sunday! We are off to church and the farm and working on the dreaded beam project. It's not so dreaded anymore though. It's coming along but we can't change halfway and call it the "fun" beam project. It's been named. End of story.

Thursday, May 26, 2011

The Fahm

When people ask us, "Where do you guys like to go to eat?" and we answer with things like: Chipotle and, well, Chipotle - this is the reason: Green Meadows Farm. (We may also be a little on the cheap side when it comes to eating out, but that's beside the point!) When we moved back to the North Shore in 2009, we found Green Meadows after searching for a local farm that offers crop shares. Like many young people/couples, we had little space to grow veggies and fruit and really wanted to have lots of fresh, organic, and local produce. It simply makes us feel good to know where our food is coming from. I call it a type of insurance.

So Green Meadows - awesome place, check out the history of the farm here, and any fans of the film Patton, be very jealous - provides us with pretty much all of the fruit and veggies we (could ever) need each week. Last summer was the first time we did the crop share (small share) and loved it so much that we signed up for the fruit shares and for both winter shares. It has meant we don't do some other things, but totally worth it to us.

We've been exposed to some really interesting food that we would never buy at the store: Daikon radishes, pac choi, and most recently: stinging nettles. We also get all the great, more recognizable stuff: tons of greens, carrots, apples, berries, potatoes, beets, beans, and on and on. And finding a use for everything is a huge challenge, but fun. Soups have been great, green smoothies in the morning, and even homemade pickled beets...so good...still have some left after 8 months.

The Fahm also raises pigs, chicken, and sheep (ducks, too, I think), and we've sampled their own ham and chicken...never had ham so good. We're starting to adjust some of our meals so that meat isn't the main player on the plate - it's simply too expensive!
Fun to hear the pigs grunting happily, but man, don't stand downwind!
I could go on and on about how much we love picking up our share every week, but suffice it to say that getting out of the car, smelling the big field of pick-your-own herbs, and enjoying the bounty of God's creation is fantastic. Make sure to visit if you have the chance!

Wednesday, May 25, 2011

Paint + Hutch= Dining Bliss

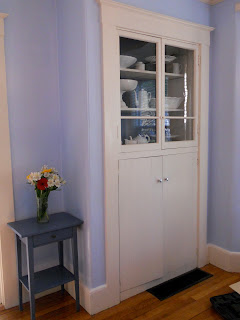
While Peter was working on Saturday, I had the place to myself. I wanted to take on a simple project that had a big impact and knew my plan-o-hutch was the perfect solution to my Saturday morning DIY eagerness. Oh but before I digress down the hutch road check out the walls! We painted the dining room and living room this wonderful light blue. I just love the way it looks with the white trim. Notice none of the below pictures include the dreaded "beam" project. The project is moving along now but I will let Peter fill you in on our beam-woes. This is a happy post. Back to the hutch.

I loved the idea of displaying all my whites in the hutch. Unfortunately since the entire hutch is white everything looked a little washed out. I wanted to pick a bold and dark color that made the white dishes say "come and use me!". I think I achieved that bold statement if I do say so myself. Also, notice the little corner to the left of the hutch. Since our entryway is so small I wanted to put a little table there where we can drop our keys on the way into the kitchen. I found one of our currently unused IKEA purchases and decided it needed a face-lift:
 Why not paint it the same color as the hutch back-splash?

Don't mind if I do!


I can't wait to see what the slip covered chairs do to tie this dark blue into the room. Remember those? Good news on that front. Mom the sewer-extraordinaire has been hard at work and has completed 4 out of the 6 slipcovers! I said I was going to help...but time just isn't on our side. 10 more weeks until Little B may make an appearance and there is much to be done! I have had a few requests for the 30wk Bump-date which I will post soon I promise. Thanks mom for making my slipcovers:)

As for the basket to throw the keys...When I recently made a West Elm visit I ran into this beauty:

 I don't know if I can justify $35 dollars. Maybe we Peter? could try making it? We'll see if I can find something a little more affordable. Or I could wait until it goes on sale...


Saturday, May 21, 2011

Big Reveal: Glider Rocker Done!

I just love a happy ending. From start to finish my little glider rocker project has been nothing but joyful. Let me start from the beginning. I knew I wanted a rocker for the nursery but was not willing to spend the $350+ dollars it costs to get my hands on a Dutailier (for some reason i say this with a French accent and really have no idea how to actually pronounce it. It sounds "fancy-pants" that way). People rave about them saying they will "last forever". If they last forever then why don't I buy it from someone else?

I looked all over Craigs List for the perfect rocker. My search criteria? White wood and good cushions. That left me with a bunch of options to choose from. I settled on contacting a young family that was moving away and had only have their Dutailier (said with French accent) for less than a year. Price tag  after some friendly email barter....

$50
Say what?! I just couldn't resist. (We were still in our apartment at the time and really had nowhere to put it. But how could I pass it up? Answer: I couldn't. I happily rode down with Peter one Saturday and made the exchange. We Peter hauled it up to our third floor walk-up and just couldn't resist snapping this photo of Peter testing it out in the kitchen:

Is that Little B? Nope. It's a pineapple.

So this little treasure stayed with us a month or two giving extra seating to our already crowded living room and anxiously awaiting a room of it's own.


Fast forward a few months...

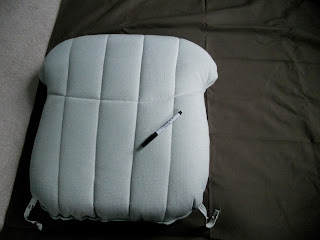
I finally got around to tackling the cushions. Seafoam green is quite a cute color but would not match the nursery I had in mind. I used this nursery for a lot of my inspiration. I liked the idea of the chocolate brown fabric with white accents for the chair. If Little B is anything like her mother she will need a chair that hides stains!

So I went to Joannes and bought some basic chocolate brown home decorating weight fabric (2 yards) and 4 zippers (one for each cushion). I wanted every cover to be washable because of my aforementioned problems with stains. The fabric and zippers cost me around $15- Joanne's was having one of their amazing sales.

I won't try to bore you with all of the sewing details but here is a quick tutorial of what I did:

With a sharpie I generously traced two pieces of all four cushion pieces.


I sewed (right sides together) and added a zipper to each piece. 
Here is where I cheated a little. (Again- not a professional seamstress here but I can guarantee a finished product in under and hour or two:) ) Each cushion either had two ties or snaps that were attached to the green cushions previously. Instead of making new straps and adding snaps I cut small holes in the new covers and pulled through the straps/snaps to attach to the chair. Much easier.

Not something you want to "show off" to your friends when they look at the chair...but you don't even see it once they are snapped/tied!

Here is the final product:


Using the same nursery for inspiration...I wanted to find a pillow with pink and teal starfish. There were a few options out there but some of them cost close to $75! For a pillow! No thank you. So I went the route of looking handmade through Etsy. Have you ever gotten lost on Etsy? I just love it and love selling my things on Etsy. (My shop has been hibernating the past few months with all the house/nursery projects).

I found this great shop Crabby Chris and she was willing to work with my color scheme to paint little teal and pink starfish all over my pillow.  Yay! Her prices are super affordable and the quality was excellent. When the pillow arrived I was beyond excited and couldn't wait to share it with the world (Once the rocker was done). So here it is! Drum roll please...


I just love it! Doesn't the rocker look great in front of the curtain closet? If you look hard you can see I painted the shelf and rod the same color as the walls. Another success and happy Craigs List find.

Tuesday, May 17, 2011

Curtains For a Closet?

There is nothing better than having a cute and organized closet. There's something about opening up the door curtain and finding a beautifully organized little space. I was looking online for nursery decoration inspiration and stumbled upon this nursery:
 

I LOVE it! One of my favorite parts is the closet with the super-cute-curtain.  Now why would I insist that my lovely husband take a closet door off you might ask? I love the pop of fabric that it brings into the room and love even more that it gives extra floor space. Here is a pic of the closet door pre-painting:

With the door there you wouldn't be able to put anything in that corner of the room because the door would need space to swing open. Not anymore! Bye bye door...helloo curtain! I had Peter hang the rod high and wide over the door. I had him extend the rod over the left side a little longer than the right because that's where the curtain will hang...
 
Tada! Curtain-closet-door.
How easy was this to make? Ask me! Ask me! As we say up here in Boston-- WICKED easy. I hemmed all four sides to home decorating weight fabric that I actually got for free from fabric.com.  When I ordered the fabric for the crib skirt they sent the wrong fabric (Brown with cream polka dots instead of teal polka dots). They said- keep it and we will send you the right fabric! Well...ok I guess I will :)  I bought the clips and curtain rod at Target for a great deal:

I am working on re-upholstering the glider rocker which I haven't introduced to y'all yet. More on that soon. I want to put the glider in front of the curtain to free up another corner in the nursery.

Does anyone else have curtain-closet-doors that they just love?!

Sunday, May 15, 2011

Cute Bridal Shower on a Budget

I hosted my first shower last weekend and I must say...it was a success. 

Bride+Food+Gifts=One dang good party.

I must say. Showers are a lot of work. They can definitely can add up quickly if you are not careful. We chose to host the shower at the bride's parents house which turned out great. We could have gone the route of choosing a venue, using their food menu, and paying through the nose for mediocre food. But why would I do that?

We needed a few decorations, food, favors, and of course the bride. The last one was easy. I just told her when and where. As for decorations...
Remember those cute poms I made a few weeks back?


Well, we hung up a few throughout the house like over the buffet, over the table where people ate, and one over the "gift opening" chair. They looked great and added just enough pink to remind people that it's a bridal shower.

We put pink tulips in the center of the table. Trader Joe's has great prices for tulips if you are interested:)

As for food, we chose to do a brunch of sorts. We had cheese and crackers, veggie platter, chips and dip, assorted pastries, fruit salad, egg bake, pulled pork sliders, and a salad. We had plenty of food! Each bridesmaid brought a few things to keep costs to a minimum. It worked out great!


For favors we went the DIY route. I bought ball jars from Bed Bath and Beyond-with a coupon of course! (Don't ever go in that store without bringing a coupon! Did you know you can use as many coupons as you want in one transaction?) Don't be bashful!

One of the brides sisters and I made sweet tea the night before the shower. (The grooms from the south and many attendees love the whole sweet tea thing. I thought they looked pretty cute in the jars!


We wrapped the jars with raffia and added a tag. I bought little clear bags from Michael's (another store you should never go in without a coupon) and filled them with miniature shortbread cookies that my amazing baker-of-a-dad made for me a few weeks earlier and froze until the night before the shower. (These are GREAT cookies to freeze and don't taste like the freezer-yuck!)


In short, people were fed, they got a little treat when they left, and the bride got some great presents. I would consider it a success-on-a-budget!

Sunday, May 8, 2011

My First (Soon to be a Mom) Mother's Day

Lately I have been waking up early on days I get to sleep in. Why you ask? It's not that I love getting up with the birds on days off. It's HUNGER. I wake up and all I want to do is eat! Like clockwork, I woke up a few minutes after 7 this morning...starving.

But wait, what's that I smell? Oatmeal pancakes? YUMMY! Peter had woken up extra early, knowing i would be ravenous, and made me my first Mother's Day Breakfast. They were delicious.

My single (which turned into 3 or 5 "Mother's Day Requests" throughout the day)"Mother's Day Request" (oh yeah, and I tend to milk most holidays for all they are worth...) was to hang the curtain rods up in the nursery. You see, I have been a busy little sewer (that is, "one who sews") while Peter has been "demo man."

Here is what I have been up to:


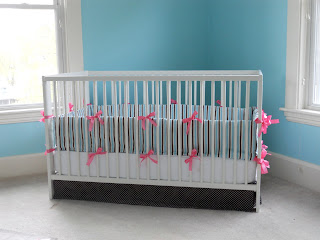
I'm not into lots of super girlie colors but a "pop of pink" was definitely necessary. I chose to add the pink in with the ties on the bumper pad. Custom bedding is definitely out of our price range and since I started making baby bedding for a few customers in my Etsy Shop I figured: why not make my own?

Doesn't the white crib look great with the bedding? The crib skirt is brown with teal polka dots. I'm really happy with how the bedding came out, and thankful I got it done while I can still crawl around on the floor and pin the heck out of it.

Oh yeah, so back to Mothers Day Request. I snagged some amazing fabric at a discount fabric store and thought it would be perfect for the curtains in the nursery. The sad part was, they didn't have enough to make 4 panels. They had enough for 2 and to save money on fabric costs, I ended up going with the sweeping-curtain-look since the windows are huge anyways. (I didn't have to worry about the windows looking tiny and not letting enough sunlight in.) So when the guy at the counter was cutting my fabric he mentioned that the fabric is designed for outdoor use and is stain/water resistant. Perfect for the nursery! I told him I was making curtains and, with this new found knowledge, I could leave the windows open when it rains and the curtains will be ok:) He didn't laugh...I did though. 

So up the curtain rods went. Peter proceeded to head to the basement to prep trim for the beam while i whipped up my curtains:


It was later afternoon when I took the picture so it's a little dark. The curtains are teal and white stripes that actually match the paint color exactly! (And no, I don't carry around paint swatches with me. That would require thinking in advance.) I took a chance, and it was a success!

I got the curtain rods at Christmas Tree Shop for $5 each. They are a distressed white and look great with my new fabric! Things are starting to come together all around our cottage, and we can't wait for the first floor to be finished...soon!

Sunday, May 1, 2011

When life hands you dust, make...dustimade?

If you haven't seen the pre-cursor to this post, please take a quick moment to view the mother of our child giggle as she begins demolishing the wall in the photo below. All I have to say is: Future boyfriends, I will make you sweat. She will make you understand fear.

So began demolition on the wall separating our living and dining rooms. To give credit where credit is due, I would not have been able to take this project on without the help of three very important "friends." The first (not pictured), is my big brother - engineer extraordinaire. We made short work of this wall together, and he gave me the green-light that we weren't dealing with a load-bearing structure. Which is good, because we want to keep the living room our living room, not suddenly have a living room-bedroom fusion.

Living Room Pre-Demo
The second friend, already spoken of by Jen, is the reciprocating saw (a DeWalt) that I'm wielding below. Also the favored tool of another DIYer who we follow, this thing is amazing. It made short work of the studs and nails in my way and, as Jen was giggling doing her demo, I was man-giggling using this thing.


The third friend, and currently the first-most-used tool in my burgeoning arsenal, is a shop-vac. Now, this may not seem like a particularly manly tool, it is the workhorse of many-a-man's shop and brought some semblance of sanity back to our lives after my brother and I brought a dust-storm down own the house. Lesson learned here: COVER EVERYTHING! We took the wall down on Sunday afternoon (Bro's vac went home with him) and Monday at lunch I was at Sears picking one for myself.
Ooops. Great profile of a starfish, though!
Shop-vac of note on right. Notice all the studs in the room. Only one was left standing at the completion of this project.
The first days of demo taught me a lot about project planning. One - especially if you're working with plaster and lath, seal off the room as best you can. And cover stuff. Or even better yet, get it out. That dust gets everywhere.

Two - have proper dust-masks. For education's sake only, Jen models the OSHA-despised DIY "Tissue Paper Filtration System." My brother and I were thankful for excellent ventilation that day.

Pretty as a flower, my love is.
And three - map out the course of your destruction with a little more care than, "What should we do tomorrow, Pete?" "Why don't we take over the world! bust this wall down?" Include things like a clean-up plan, waste removal thoughts, and always, always map out coffee breaks.

Yet another thing to thank bro for: a killer latte.


Related Posts Plugin for WordPress, Blogger...